Here is part two of my "made from the heart" gifts, haha. My mom really wanted a new checkbook cover once she saw the one I made, so I figured, hey I'll make them for both moms. Again this was one of my first attempts at ruffling, and I never realized you were supposed to pull out the basting stitch when you were done. Oh well, hopefully no one will look too close!
A definite benefit of my Hubby working at a bank is that he was able to snag me a couple of those plastic checkbook covers for me to cut apart.
Hope everyone had a Merry Christmas!
Pages
▼
Thursday, December 30, 2010
Tuesday, December 28, 2010
Hand-Crafted Christmas: Sunglasses Case
So here is part one of the intense (well at least for me) sewing I did while I was unemployed. Because of the unemployment issue I decided to make as many gifts as possible. I took the sunglasses case idea from this awesome tutorial over at My Blond Ambitions and made a couple for sunglasses and two smaller versions for reading glasses. My mom and sister gave me these really cute tags that have my name on them and I finally got to put them to good use! These little pouches also gave me the chance to finally try making a ruffle. I have been so intimidated by ruffles that I have refused to try and instead would pawn off the task to my mother. I really don't know what I was so terrified about, yes they take time, but they aren't nearly as challenging as I made them out to be.
The details
Monday, December 6, 2010
Christmas Card Wreath
In the December Martha Stewart Living magazine I saw a really cute idea for a Christmas card wreath holder. She made it out of an embroidery hoop and clothespins. While at the dollar store the other day I was looking at the frames and the idea popped into my head to make the holder out of a frame. I grabbed a frame, clothes pins and a snowflake ornament, and for $3 + some ribbon I had laying around, I have a new Christmas card display to hang on my coat closet door.
Saturday, December 4, 2010
Ribbon Christmas Trees
I have been sewing and crafting up a storm lately, but almost all of those creations are Christmas gifts, and knowing the recipients would peek on here, I have to hold off posting them.
But here is one I can share.
I saw these ribbon trees sometime during the summer at Hobby Lobby for about $20 each on sale, at least for the smaller one. I was not about to spend over $60 for 3 trees that will grace my table one month a year. So I gathered foam cones, ribbon and ornaments that were crazy on sale at JoAnns during Black Friday weekend.
All you need to make the trees is:
Ribbon cut in 4 inch strips and glued in half
Cones
Toppers
Glue gun
Lots and Lots of PATIENCE!
And about the time your back starts aching from sitting at the table gluing, measuring and cutting, you will have a newly finished holiday decoration!
There are only 2 trees for now because the medium size one in still in the making.
**I'll be linking these trees up here
Saturday, November 20, 2010
My Sister was Inspired...
My sister was going through a bag of old clothes and came across this ankle length, lifeless, plain black dress.
Before tossing it aside, she figured she could make something cute of it. So she chopped off a good portion of the length and jazzed it up with a festive ribbon, which I think is the best part because you can customize it each time you wear it!
Snip snip
Monday, November 8, 2010
Head Warmer Re-Do
My husband and I went skiing/snowboarding this weekend and since it was going to be sunny and in the 50's I wanted to wear just an ear-warmer rather than a hat. The only ear-warmer headband thing I had was white and blue and didn't fit well. Apparently I have a small head, cause a really cute hat at Target didn't fit my head either.
Anyways, I grabbed a brown sweater out of my closet that hasn't been worn since '06 and got to work. I began by ripping out 6...SIX different seams on the original head warmer. I guess Old Navy wanted to make sure that thing lasted.
I then lined it with the brown soft sweater material and threw a flower on the front. I really like the crochet head warmers out there, but this was my free version.
The little leaf things got all crumpled from my goggles.
Yep, that's my hubby.
Monday, November 1, 2010
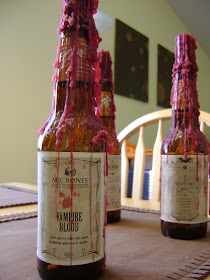
Bottle Candle Holders
Sorry this is after Halloween, but I wanted to share it anyways. To compliment a centerpiece I made for my floral design class, I made some spooky vintage Halloween themed bottles. With some vintage labels I found online, you can turn rootbeer bottles into candle holders. To get the candle wax to melt down the bottle, use a razor blade to slice the top as it is burning. This allows a place for the wax to run down the bottle. It did take a while to get the right look, but I just burned them while I was watching tv. They are a little fragile so I am hoping they will hold up for next year.
Tuesday, October 19, 2010
Button-Embelished Bobby Pins
A friend of mine, who is actually getting married this weekend (whoo hoo!) came over the other night to make hair pins for her brides-maids. She originally asked to borrow my glue gun to make them, and sadly enough I got panicky with separation anxiety from my glue gun! So sad. She had the super cute idea to glue buttons on bobby pins and they turned out pretty awesome, at least I think so. I need to go get some bigger bobby pins to make my self some.
Friday, October 8, 2010
Thrifty Seasonal Decor: Part 2, Fall
The other day browsing around on my favorites list, I saw this awesome idea at Oops, I Craft My Pants, and immediately swiped the idea! I too made the trip to Home Depot and smuggled out a handful of paint chips in fall colors. The best part about this project is that it was FREE! Well almost, I did have to get a new Sharpie for the tree trunk, but other than that...paint chips-Free, and MDF-Free (sitting in my garage from a headboard).
I drew out the tree trunk and then got to gluing. You'll probably notice I yanked off one of the falling leaves, seemed like a little much so it had to go. It's one of my favorite fall projects yet.
**You'll be seeing this here.
I drew out the tree trunk and then got to gluing. You'll probably notice I yanked off one of the falling leaves, seemed like a little much so it had to go. It's one of my favorite fall projects yet.
**You'll be seeing this here.
Thrifty Seasonal Decor: Part 1, Halloween
I finally dragged out all of my Halloween and fall decor and got to work. I soon realized that all of the decorations that seemed to almost overpower our little apartment last year now seem sparse in our house. To add some quick Halloween flair I printed out some vintage Halloween prints and placed them in frames around the family room. Here are just a couple.