Pages

Thursday, July 29, 2010

Express Inspired Headband

This really cute Express Headband caught my eye the other day while shopping. One glance at the price tag...$19.50, and I kept walking. But as things do, I kept thinking about how cute it was and what outfits I would wear it with. So I looked at another pic online and got to work.


I picked up a 5-pack of skinny plastic headbands in brown and black at the Dollar Tree and some black ribbon at Walmart for I think $1.47 each roll. So for less than 5 bucks I was determined to make a similar headband.

I used a sheer and satin ribbon for a little more texture. I lined them up on top of each other and gather the pieces by hand til I had the right length and gather-age. With the ruffle done, I took the satin ribbon and made a loose rosette to put at one end.


Once those were done I just hot glued the ruffle and rosette to the band...and DONE! I have a new headband I plan on wearing to church this week!


I will be linking up at these parties this weekend:
Tatertots and Jello
Crystal's Craft Spot
Fingerprints on the Fridge
Just a Girl
The Shabby Nest
A Few of my Favorite Things
Someday Crafts

Wednesday, July 28, 2010

Quick and Easy Puppy Pillow

Well on a more successful note, I was able to throw together this easy pillow for our puppy. (I'm a little excited about the little guy if you couldn't tell). Since it would be home most of the day in it's crate, I felt horrible that it would be laying on the hard floor all day. My sister likes to use old t-shirts for cushion in packages, so I used one of the latest ones she sent. A little batting and ribbon and I had a finished product.


You can call me lazy or ingenious, but the quickest thing to do was to cut the shirt under the sleeves, leaving only 2 sides to sew together. I flipped it inside out and sewed one end down. I flipped it back to the right side and tacked down the ribbons on the corners. Once those were secure I added some batting and machine sewed up the remaining end. I saved the bottom hem of the shirt to machine sew on the outside so there would be no raw ends. I tied up the ribbons, and now it is ready for our little addition to our fam.


I also originally wanted to put his name on it and/or some paw prints, but considering there are going to be a more than a few "whoopsies" and tosses into the wash, I figured I'd leave this one plain.


FAIL :-(

So not everything I think up in my head is a success. Sometimes it fails horribly. This is my second craft in a row that did not come out as planned. Maybe I'm losing my touch (I hope not!).


My plan was to make a really cute dog tag for our puppy that we get to bring home Friday. I was going to have the name on a smaller washer, and our phone and address on the big one. Well stamping after painting screws up the paint. And I just think my hand was really tired on the second go round.

Sadly our puppy will not have a home-made dog tag. I think he will get over it though.


Friday, July 23, 2010

Link Parties

Visit these Link Parties! There is some of my stuff on them, and bunch of other great ideas from craft-a-holics like myself!

Join  us Saturdays at tatertotsandjello.com for the weekend wrap up     party!

Tuesday, July 20, 2010

Washer Necklace II

Here is another example of the washer necklaces. You can add a touch of color with spray paint, or some nail polish, which is what I used for the red on this one. Also when I made the previous ones I thought a good solid table would suffice for stamping. I was wrong. Stamping on concrete makes a ton of difference. A couple good swings and you are done!


Sunday, July 18, 2010

Memo & Picture Holder

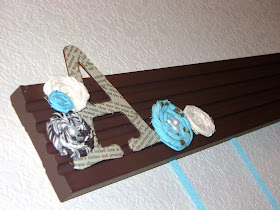
What can you make with a piece of molding, ribbon, drapery hooks, and fabric scraps?? A memo holder of course!

This little gem is for my sister's b-day, so I hope she doesn't peek before I get it shipped! Its a simple project that you can customize how ever you wish, and is darn cheap too. It is definitely a nice change from bulletin boards, and the ribbon boards (although I like those as well).


Thursday, July 15, 2010

50 and counting!

I'm so excited to see that Something Pretty has made it to 50 followers! I didn't expect to reach that many, if any, when I first started this blog. I thought it would probably just be viewed by my family and friends just to be nice, lol. Thanks for all of the support so far...I can't wait for the next milestone...100!

*Robyn

Published with Blogger-droid v1.4.5

Monday, July 12, 2010

Washer Necklaces

I have been seeing a lot of washer jewelry and crafts around lately and wanted to try my hand at them.

All you need are a few washers, a stamp set, beads, ribbon, and a chain and the possibilities are endless!
The first necklace I made was one with my husband's and mine's initials. I had to give the stamping set a few tries before I got the letters to look decent. After stamping the letters I colored in the letters with a sharpie and wiped it off immediately. This way the letters have more definition. A little dab of glue helps the washers stay in place.


The second necklace was a little more girly. I stamped O's around one washer and sharpied it. The second one got wrapped in string and a coat of paint. After pairing them together I glued on a couple of ribbon rosettes.


I have so many more ideas I can't wait to try out with washers!

I've linked these up Here, Here, Here &....Here

Finishing Touches

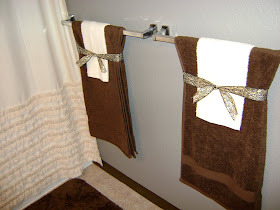
It is amazing what a little bit of ribbon can do...


Here are my sad, plain towels in the guest bathroom


And with just a couple cuts of ribbon, my towels have new life in them. Plus, as my hubby commented, "now guests know not to use them." My thoughts exactly.

Thursday, July 8, 2010

Thrifty Bandanna Skirts

My sister was browsing blogland and saw a bandanna dress tutorial. Since I have been on a sewing kick I volunteered to make my little niece some bandanna skirts.

I got my nieces measurements which were a 17 in. waist and 6 1/2 in. from waist to knee. I cut a strip of elastic 16 1/2" so that I'd have a half inch to overlap to stitch together. To cut the length I kept the bandana folded in half and cut 8" up from the end. This way it gave me plenty to fold over for the waist.

Pin the two bandanna pieces together wrong side out and stich the two short ends. Then sew down about 1/4" around the waist then turn it down another inch where the elastic will be threaded through. I did not cut any of the width down because I wanted them poofy and girly.

After the waist seams are sewn leave a small opening to pull the elastic through with a safety pin on one end. Stitch the elastic ends together and then hand sew or machine sew the opening together. And all done!

I threw together some headband rosettes with the extra bandanna material so that she has accessories to match her skirts. Every little girl needs plenty of accessories!
***And the best part? Each bandanna was only $1 at Wal-Mart and the elastic was only $1 as well. Two skirts for $3! Can't beat that!


Join  us Saturdays at tatertotsandjello.com for the weekend wrap up    party!
Funky Junk's Sat Nite Special